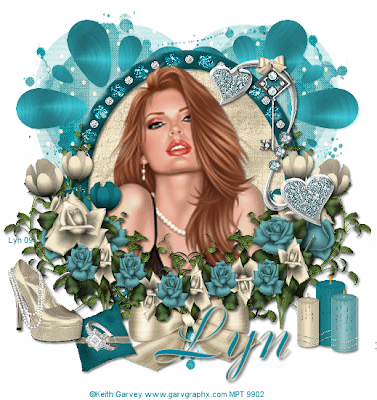
This tutorial was written by me, and any resemblance to any other tutorial is purely coincidental.
It would be nice if you let me know you have tried my tutorials I love to see what you do with them, send me a copy and I will add them to my slide show.
Supplies needed:
PSP (I used PSP 9)
Animation Shop
Filters:
Alien Skin Eye Candy 5 - Impact - Brushed Metal
VM - Natural - Sparkle
Tube of choice I am using the beautiful artwork of Keith Garvey if you wish to use his artwork then you need to purchase a license from www.mypsptubes.com
The Scrap kit I used is called Diamond Blue (FTU) by Doris of Scrap Dimensions, thank you Doris …. And you can get it from http://scrapsdimensions-dorisnilsa.blogspot.com/
The mask I used is WSL_Mask86 by Chelle thanks again Chelle http://weescotslasscreations.blogspot.com
Okay lets get started
Open a new image 700 x 700 we can resize later flood fill white
Add a new raster layer and copy and paste a paper of your choice I used paper 06 then Layers – Load/Save Mask – Load Mask From Disk and look for WSL_Mask86 and apply – right click on the group layer in your layer palette and merge group I used the Raster Deform tool and stretched it a little on all sides.
Copy and paste the Glitter petals2 and dropshadow place it to the right of the Tag duplicate it and image – mirror then merge down so both layers of the Glitter petals are on 1 layer (see mine for reference) then resize and copy and paste Frame 2.
Click inside the frame with your magic wand and Selections – Modify and Expand by 5 then copy and paste a paper of your choice I used Paper 9 – Selections – invert and hit delete on your keyboard then drop the paper layer below the frame and drop shadow your frame.
Now add your tube (I cropped the top of the tube then increased the size to fit inside the frame and then used my eraser tool remove any overhanging at the bottom of the frame
Add whatever Elements you want it’s your choice I used Bow 1, Candles, Embellishment 3, Key, Leaves, Ring, Rose 2,Rose 3, Rose 4, Shoe, String of Roses, Tulip 1 and Tulip 2 for the key I used Embellishemt 4 and erased the diamond and the chain and attached the key to the bow resizing as necessary.
Place each element where you think it looks best make it your own.
Give each layer a drop shadow 3, 3, 50, 5
Image – Resize – All Layers checked 500 x 500 Smart size
Add the artists copyright and your watermark then add your name I used the Font Boulevard using a colour to match the kit and giving it a Stroke of 1 with a gold colour
You can save as a Jpeg now if you don’t want to animate if you wish to animate carry on below
ANIMATION
Click on the Glitter Petals layer in your palette and Effects – EyeCandy 5 – Brushed Metal with the settings below:
Settings: Hand Brushed Metal
Basic:
Hand Brushed
Direction – 0
Highlight Sharpness – 50
Grain Contrast – 40
Grain Length – 23.62
Brush Size – 118.11
Brush Density – 60
Brush Variation – 45
I also used the freehand selection tool and outlined the hearts on Embellishment 3 and used VM – Natural – Sparkle with settings:
Size – 20
Red – 200
Green – 175
Blue – 160
RND Colour on/off: 255
Random Seed: 100
I then made the ring layer active and did the same with VM – Natural – Sparkle with the same settings
Now copy merged and take it to Animation Shop and Paste as a new animation – back in PSP undo everything you did with the effects and do the same again keeping all the same settings but clicking the random button in each effect and in the VM – Natural – Sparkle slide the Random seed button to 120 – Copy merged and in AS paste after the current frame and back to PSP and undo it all again and then redo clicking on the random button again and with the sparkle slide the random seed button to 140.
You should now have three frames in AS click on the first frame and Edit – Select all and click on Animation – animation properties and click on Opaque and change the colour to white click on View to view your animation and if happy Save as a Gif and your done.
I hope you enjoyed this tutorial and if you have a go please leave a little luv it’s nice to know if you enjoy it
Many thanks for trying my tutorial.
Lyn


Very nice tut Lyn.
ReplyDeleteI enjoyed doing it. I did do my background a little different with the glitter elements because I didnt have the brush metal effect on my Eye Candy 5 which I have no idea why not.
It turned out really pretty though, and love the colors and design.
Photoshop and the like have always scared the hell out of me. Sometimes I wonder if you need six years at university to understand them!
ReplyDeleteI have enjoyed this, my first browse of your blog!
Thanks!